Monday 11 March 2024

Launching StoRPer, the opensource, modular robot rover.


Last week was epic! I finally got around to launching the stoRPer robot both in terms of publishing the opensource repo and listing a first run of boards for sale on the Tindie shop. I'd procrastinated and stalled on getting it released as I'd imagined doing a higher end launch video and also having more functionality explored in the design at launch. I'm in a phase of "perfect is the enemy of done" at the moment so I decided to do a quicker "messydesk" style launch video (see above!) 

It had a brilliant response and all the original run sold out in around 6 days with orders going all over the world. It quickly got picked up by Toms Hardware with a nice write up and also was quickly spotted on the XDA developers platform. Closely these articles were followed by the Tindie Blog (which I write for so thanks to my colleague Alex picking up the StoRPer story there) and the mighty Hackaday. All this activity had pushed the original launch video to nearly 6K views which is fabulous. 

So all the first run are shipped and starting to reach their owners and I've ordered a second slightly larger fabrication run and, at time of writing, we have about 49 units on the official waiting list, if you want to add your email to the waiting list this means you'll get a notification when they come back in stock. 

For this week, I have been invited on Toms Hardware's "Pi Cast" number 168 on Tuesday evening (6pm GMT) to talk about StoRPer and I'm also working on a few new parts and ideas to expand the repository! 

Really pleased and excited to see what the wonderful community does with them!


Friday 23 February 2024

FreeCAD, FOSDEM 2024 and Blender Trip.


I recently went out to Brussels for a week which included a couple of days hanging out at Brussels Hackerspace with members of the FreeCAD community. I then attended the FreeCAD Day, which was a kind of un-conference day set up to show and tell lots of developments in the community and also have facilitated sessions of work. Then over the weekend it was FOSDEM and then some of the FreeCAD posse travelled up to Amsterdam to have a visit to the Blender Institute and meet with Ton the Blender founder. 

I've written elsewhere about lots of bits of this trip, but I wanted to pull out some more personal account stuff here in a little blogpost for posterity. There's stuff here about FreeCAD day, there is a story I wrote here about how FreeCAD, Ondsel and Prusa saved FOSDEM, and also a general round up from FOSDEM from the prospective of FreeCAD activity here. 

It was great at the beginning of the trip to hang out at Hackerspace Brussels, it's likely the last time I could visit it in it's present setting as it is planning to move to a new site shortly. It was situated in this amazing empty old industrial building. The building is set to be demolished and or converted into accommodation at some point, but until the work begins the company that owns it allows people to use the space. There is plumbing and power but also a heap of dereliction. It's full of fascinating projects and communities, and also possibly serves as a few peoples home. It definitely felt a little like a temporary autonomous region which always makes me feel relaxed. :)

Outside the building there's a large area, with a complete skatepark/bowl, loads of art and remnants of festivals and other things that have happened at the site. As I say super super cool place to hang out. 

One evening my gracious hosts took me out for the evening to neighbouring city Leuven. It's a smaller place than burgeoning Brussels but super lovely with lots of old parts and lots of bars! 

FOSDEM was a blur of excellence. It's funny how quickly you can have a FOSDEM moment and I had one very early on on the Saturday morning. The neighbouring stand to the shared FreeCAD/KiCad/LibreSpace stand was Pine64. Whilst they were still setting up a person was admiring the Pinephone sat in it's official keyboard case. They then said how much they loved small clamshell design ever since the HP Jornada 720 PDA. As a lover of the 720 myself I got chatting to them and was quickly reminising about Jlime, a linux distro/image for the Jornada. They looked at me astonished and then said that they had contributed to JLime... we both agreed it was incredible odds that we would be linked by such a secular device and distro that we took a selfie! Small world. 


Over FOSDEM I met loads of notable brilliant people. It was great to meet Ben on the Pine64 stand, Ben is the developer behind Ralim/Iron OS firmware which my pinecil soldering iron uses. It's ace to meet the people behind devices you use all the time. Ben also showed me a brilliant early prototype of the pinecil which he said was insane in that it didn't hold the tips/elements very well so was quite a danger at times!

I also got to meet Arturo from Solder Party. I love Arturo's work and also love that he has taken the time to talk me through issues, usually caused by my own stupidity, and also helped me by discussing his stamp design for the RP2040. As well as a lovely chat, I got some amazing stickers, and I got to see and touch an amazing top secret prototype for an upcoming Solder Party product. 

Other notable stuff was I felt really privileged to introduce Yorik, FreeCAD project lead, to a few notable people. I spotted Martin one of the core Inkscape developers and got them chatting and it was great to see and introduce old friends from the Libre Space Foundation. Speaking of which I love how good an example LSF projects are for FreeCAD and KiCad they were perfect partners on the stand. 

Sunday was again really busy and I was too engaged at the stand to attend the only talk I really wanted to catch, Joey Castillo who makes amazing projects including The Open Book, the fantastic opensource e-reader. I was resigned that I'd probably missed my chance to say hello irl when suddenly I heard a US accent asking a colleague on the stand if Concretedog was around! Joey! Thanks for taking the time to come and find me. You rock!


On the Monday a few of us went up to meet Ton at the Blender institute. It is a fabulous site with such fabulous creatives working in it. As a side note any office/campus that has dogs and also names their plants is a good place! We got a fabulous tour (I love how we all took selfies in the network room!) and then had a long sit down with Ton discussing Blender's story and how it managed to scale whilst retaining it's community members, contributors and roots. Really quite inspiring. 


SO there we go. A fab trip. Brilliant to meet parts of the FreeCAD crew who I've only ever interacted with online. Next FreeCAD Day is provisionally being looked at in Chicago later in the year. Maybe!


Wednesday 21 February 2024

New FreeCAD Video, How to Unwrap Meshes to Make Mould Templates


Posted this video the other day, it's a process that allows you to take curvy surfaces and create flat templates for them via meshing and unwrapping. Obviously I've focused on making templates/patterns for moulding rocket nosecones, but equally the process could be useful for loads of things. 

Tuesday 19 December 2023

Custom Motor files for Simulations in OpenRocket from Thrust Curve Image


Openrocket is excellent and it’s fantastic to have opensource tools to design rockets and then simulate them in flight. The simulation aspect relies not only on the rocket design but also on good data being available for the rocket motor you wish to simulate. Openrocket has a built in database of RASP/.eng motor files for many common motors. If you are using an Estes for example then you are pretty much assured to find it in the database to run your simulation. What can we do though if our motor isn’t available in the database.

Well a first solution would be to see if there is a RASP/.eng file for your motor anywhere online. Starting off at the manufacturers site and then perhaps perusing through a few forums to see of you can search it out. Recently though I was looking at a new and pretty unknown motor here in the UK, the TSP E20, and I couldn’t find a file for it anywhere.


What I could find though were thrust curve diagrams for the motor provided by the manufacturer. I then recalled that there was a piece of software that purportedly could trace over a thrust curve image and create the file I needed. The piece of software that can do this is a small Java application called TCTracer and it’s available over on the Thrustcurve site. It’s available for a range of operating systems including windows Mac and Linux and it installed flawlessly on my Arch Linux machine.


With that installed and the image of the target motors thrust curve diagram (a screenshot will do) we can create our motor file. You first import the image into the TCTracer application. As a side note I first trimmed my screenshot image with the wonderful free and opensource GIMP image editor. Whilst trimming made it slightly easier you can scale the grid in TCTracer to accurately place the grid range over your image regardless of what extra imagery is on the page.


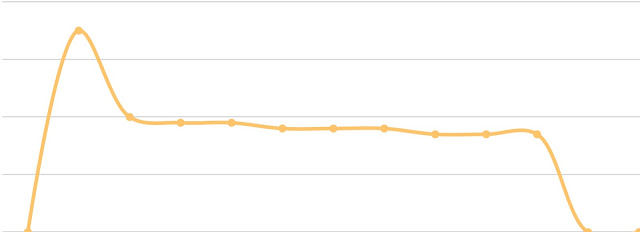
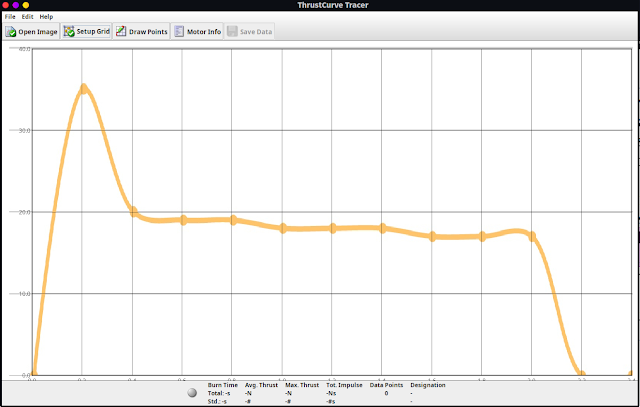
Next in TCTracer click the “Setup Grid” button. You should see a small dialogue box “Grid Overlay which needs some details adding. First of all is the X axis start and end points in seconds. Most of the time you will want to start at 0 seconds and for our TSP E20 motor the curve chart data was logged till 2.4 seconds with a marker line at every 0.2 seconds. So we set the X axis at 0 to 2.4 seconds. The next line is the sub divisions of the X axis. Counter intuitively this isn’t expecting a value in seconds, it requires a whole number value that represents the number of subdivisions between the start and end point. In reality you can actually leave this empty or place “1” in there as you don’t strictly need the subdivisions, but it can be nice to make everything match up well visually. For our example we added “11” which means our 2.4 seconds contained the correct amount to place a subdivision marker at every 0.2 seconds. The last two lines are similar for the Y axis, you select the maximum height value and then the number of subdivisions. Our thrust curve diagram had a Y axis scale up to 40N in increments of 10N, even though the motor topped out at a little over 36N. So we set the Y axis as 0 to 40, the number of sub divisions to be 3 and set the units to Newtons using the drop down menu. Finally you need to drag the grid lines to align them with your image, note that you align them to the image chart lines and not the peak of the curve.


Next click the “Draw Points” button. You can then trace over the curve in your image. You don’t need to place a point at the zero time point rather just start clicking the line to trace over it. At the end of the thrust curve you definitely need one point to have returned to zero thrust or else you will have a small error indicator at the bottom of the page. To undo a misplaced trace point simply left click on it again to make it disappear.


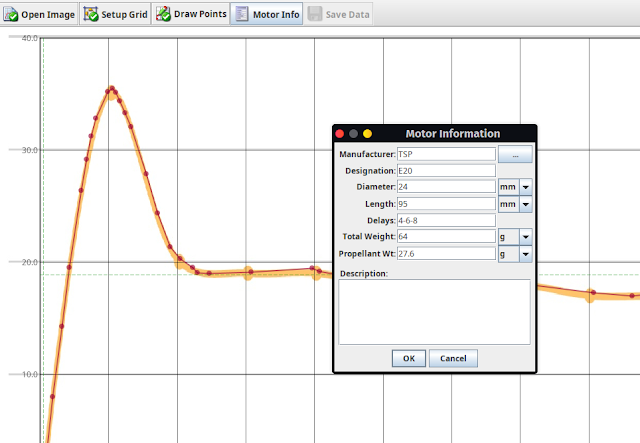
The final part of the process is to click the “Motor Info” button and in the Motor Information dialogue add the details of the motor. This is a largely straightforward if you have the data about the length and the weights of both the complete motor and the propellant. To add a choice of ejection delays you can add the value in seconds followed by a “-” so for example 4-6-8 in the delays section of the motor info dialogue will allow you to switch between a 4, 6 or 8 second delay in Openrocket. With all your motor information added click OK. Finally click the “Save Data” tab/button and save the .eng file.


In Openrocket you need to provide a path to where you have stored your .eng files. To do this in openrocket click “Edit” and then “Preferences”. On the main preferences dialogue box there is a section titled “user defined thrust curves” click the “add” button in this section and navigate to the folder/directory holding your .eng files and then click the new “add” button. I’ve found I need to then close and reopen Openrocket to set up the path correctly. Now if I go into select a motor I have the TSP E20 with various delays available to select for simulation.


Massive kudos to John Coker who created TCTracer and maintains the Thrustcurve.org site.


Tuesday 31 October 2023

Desk Vice Restoration, 3D printed jaws from Pop/Soda Bottles!


I love having a desk vice at my workstation. For ages I used my small Record "Imp" vice but that is doing good work in one of the sheds. I'd been using a cheap new no brand clamp on vice for a while but I was fed up with the non replaceable jaws not closing true. I spotted this interesting vice on Ebay a while ago which, although unbranded, is a reasonable little thing that also can swivel on it's base. I liked the width of it and the general form factor and put in a very low bid. It was pointed out in the listing that one jaw had been replaced with a piece of wood so I won the auction for very little cash!


As arrived the vice was a bit sorry looking with it's one wooden jaw that had been glued on! I stripped off the wooden and the steel jaw and cleaned off as much glue as I could. The metal jaw was held on with 2 M4 bolts and, after cleaning and then re tapping, the holes behind the wooden jaw were ready to be used again. I don't really do anything heavy on my desk vice, small work holding is the order of the day with anything needing more than delicate handling going into a bigger vice in the sheds. Whilst I should have fired up the milling machine and made up a set of aluminium soft jaws for this I decided to do a quick experiment and 3D print some jaws. After a quick digital caliper session on the original steel jaw I quickly knocked up a jaw in the amazing FreeCAD


Finally, I printed the jaws and fitted them. Interestingly I've recently written a series of articles over on RS Designspark where I built a "pullstrusion" system capable of turning plastic pop/soda bottles into decent 3D printable filament. So these jaws used to be about one and a half 2 litre lemonade bottles. You could probably make 2 jaws from one bottle but I bumped up the infill to around 50% to make them a little durable. So far the jaws have held up well. You could also consider them semi sacrificial as it's trivial to print up a new set. Speaking of which I definitely plan to print up a set in flexible TPU filament to create a proper set of soft jaws. 


Wednesday 18 October 2023

FreeCAD and Openrocket, a fabulous combination!


FreeCAD, aside from generally being an excellent free and opensource CAD environment is ever developing and being extended. Over the last year or so a really interesting development has been the Rocket workbench. If you are new at the zoo, FreeCAD works with a workbench system where different workbenches contain lots of different tools grouped into themes. So for example if you want to convert a 3D part into a technical drawing there is a specific Techdraw workbench which, when you switch to it, has all the tools to lay out a technical drawing. Many workbenches are built in but you can also download and install extra workbenches of which the Rocket workbench is a good example. I’d love to see more rocketry people using FreeCAD and so this post is aiming to show why FreeCAD, as well as Openrocket, might be well worth learning!


Openrocket and FreeCAD have lots of active development happening and it just happens that an amazing contributor, Dave Carter, AKA DavesRocketShop, is contributing development to both these excellent opensource pieces of software. Further than that Dave realises how powerful interaction between Openrocket and FreeCAD might be and is working to make both these packages work together usefully.


As a starter example (but frankly enough of a reason for many rocketry types to learn some basics of both these packages) is the built in parts database. In Openrocket if you are designing a rocket from scratch you might chose to incorporate an off the shelf nosecone for example. Clicking the Nosecone icon in openrocket the component database will either launch automatically, or you can launch it from the regular nosecone dialogue window by clicking the “parts library” button in the upper right hand corner. Either way you’ll see a well maintained and curated list of commercially available nosecones from a range of manufacturers.


OK, Over to FreeCAD. Say we now can’t find that commercial part to buy in our local rocket shop we might think about having to draw it in CAD and perhaps 3D print it. Well, the exact same database is available in the Rocket Workbench in FreeCAD. Clicking the nosecone tool icon should launch a nosecone parameter dialogue in the combo view window on the left of the screen. Scrolling down you can click “Lookup” to launch the exact same database of components as you just launched in openrocket. You can scroll to the same nosecone and select it and it will appear as an object in the live preview and also as an object in the combo view. If you wanted to simply 3D print this you can select the object in the combo view window and then click “File-Export” to export the nosecone ready for printing. You can pretty much do this without learning any more about FreeCAD and Openrocket if you wanted too, but, if we learn a few more skills, we can do some other really simple yet useful rocketry tasks.


Another simple example perhaps of use is imagining we want to build an upscale version of a rocket with a scaled up nosecone. If we select a nosecone from the database in FreeCAD we can then jump over to the Draft Workbench. With the nosecone selected we can now click the “Scale” tool icon. As a tip to help you find tools, if you hover over any icon in FreeCAD it will say the name and a small description of the tool and I describe the tools with the names these rollover descriptions use. In the scale dialogue click the “enter point” button and in the next dialogue make sure that both the “Uniform Scaling” and the “Create Clone” buttons are selected. Then change any one of the X Y or Z axis scale amounts to the scale you require, so for example if you want to double the size of the nosecone change one value to “2”. The other values should change automatically and then when you click OK an upscaled (or downscaled) version of your nosecone will appear as an object.


Finally, for this example, if you know a little about using FreeCAD you can easily add geometry to parts you create on the rocket workbench. In the image I’ve simply brought a cloned nosecone part into the Part Design workbench and then added some features to make an attachment point for a recovery system. If you are interested in developing your FreeCAD skills my free to download tutorial book FreeCAD for Makers is available from the Raspberry Pi Press here.


This is only the tip of the iceberg in terms of what what FreeCAD and Openrocket are capable of. The Rocket workbench is amazing in terms of what it can automatically generate parts wise. Nosecones, transitions, tubes rings, rail buttons, rail guides and more; there is a really impressive fin can generator as well as some pretty high end fin flutter analysis tools. The real beauty is that you can simply transfer dimensions and data over from a design you have worked on in Openrocket. Having rebuilt it quickly in FreeCAD there are so many options available, as an example I can simply select a centring ring in the FreeCAD design and take that part to the Path workbench and create toolpaths to then cut the rings on my CNC router. I can export all manner of files for parts for laser cutting or other processes. It’s a really good tool to learn some skills on if you are a rocket fanatic!


Monday 2 October 2023

Ballooning at Liverpool Makefest and Lessons Learnt.


So this could win the award for the most overdue blogpost ever. Back in summer I attended Liverpool Makefest as a maker and showed off lots of flying stuff under the title "Concretedogs Flight Lab", which coincidentally is also the title of book of projects I've been not finishing for a long time! One of the activities I showed and told at Makefest was my DIY Hot Air Balloons.

I originally wrote about these ideas back in Hackspace Magazine Issue 61 where I talk about their construction. As most councils have quite rightly banned the use of fire filled disposable balloons the approach here is to heat the balloons to perform shorter hop like flights and, when indoors, use a light kite line as a tether.


Previously I'd heated the balloons having an assistant hold them up and I fill them from the base with a single electric heat gun. But in an attempt to create more lift for this event I made a chimney from a meter length of vitreous enamel pipe into which fed 2 electric heat guns. It definitely makes more lift but I think the concept could be improved a lot. One of the issues is that the air is constantly moving and being pumped into and out of the balloon. It would be better to have less movement of the hot air and more heating! One possible solution would be to have a series of baffles in the chimney so that it creates more heat and less airflow. The other option I'm still really keen to try on a calm day outdoors is using a camping stove in the base of the chimney to get a high temperature whilst not creating a moving column of air.

The other challenges are the tether, there is of course the challenge of keeping the tether light and as altitude increases the weight of the tether becomes more apparent. Another problem I had at Liverpool was that if the tether snagged (usually on me!) this would cause a jerk in the line and often, especially when the balloon was quite high with a lot of tether weight, the balloon canopy would tear. I'm planning to run some experiments with a small length of really lightweight thin shockcord/elastic at the balloon end to try and mitigate this problem.


Wrapping up, this activity was great, loads of people mentioned that they wanted to try it and lots of people were entertained by the site of the balloons. It really is a lot of fun for a couple of quids worth of materials!